Licence plate holder
- Thread starter PeaceMaker
- Start date
Gaz2212
New member
Hi mrirvs
Did your local dealer manage to get you the tail tidy after all
Gaz
Did your local dealer manage to get you the tail tidy after all
Gaz
bones
New member
No I was worried cause I got mine in the week and it was almost £100 for the rail tidy .... I'm relieved ?No no no, just the tidy for that, sorry if I got your hopes up lol
Just got to set aside a rainy day to fit it
da1kini
New member
Yes the led light connector is different and they include a conversion kit to redo the original connector coming from the bike. I choose not to change that, I cut of the one coming from the tail tidy kit and redone it so it fits the original from the bike. Rather mess with the tail tidy kits cabels than the bikes, right?I got a Yamaha one, ended up being a bit of a Meccano set to put together including the led indicators. I think for £100 it's good value.
Is it true that the led tail light connector is different from the original?
Last edited:
da1kini
New member
good luck to you sir, and don't forget to post pictures here when ur doneSounds reasonable to me mate, seems a bit weird it didn't either come with the right connectors in the first place AND make you cut the wiring on the bike.
Going to try and get it done during the week.

rickyexpresso
New member
is very cool, but very expensive
da1kini
New member
Yes but you get a lot for it.is very cool, but very expensive
cosmikdebriis
New member
Okay so here's my findings on trying to use the original tail light assembly but without the extension arm.
First, as previously mentioned, it is not possible to simply remove the arm and then bolt the rest to the original mountings,
Secondly and perhaps most importantly. It is NOT possible to do a conversion without doing irreversible damage to the original assembly.
So... Taking the above in to consideration...
I am experimenting with making up some fairly simple U shaped brackets to replace the longer aluminium ones. See pics below.
The area of the original fitting needing to be cut is arrowed. It's a bit of plastic but if you cut it and then revert to the original system it will inevitably show. So... Be warned.
I should also mention that, as this is an experiment, the ally I'm using is too thin to last (but easier to work). Once I have the design sorted I would use thicker brackets.


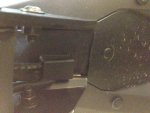
In the final image you can see the underside of the bike (It's a bit dirty... Sorry).
I have highlighted the mounting bolts as "A" on one side. On the other side is the experimental/bodge bracket B.
It should be possible to make the brackets so that they will not be visible when fitted (which is just as well).
Just to add this is quite fiddly to do with lots of plasticky bits to un clip and hopefully not break.

First, as previously mentioned, it is not possible to simply remove the arm and then bolt the rest to the original mountings,
Secondly and perhaps most importantly. It is NOT possible to do a conversion without doing irreversible damage to the original assembly.
So... Taking the above in to consideration...
I am experimenting with making up some fairly simple U shaped brackets to replace the longer aluminium ones. See pics below.
The area of the original fitting needing to be cut is arrowed. It's a bit of plastic but if you cut it and then revert to the original system it will inevitably show. So... Be warned.
I should also mention that, as this is an experiment, the ally I'm using is too thin to last (but easier to work). Once I have the design sorted I would use thicker brackets.


In the final image you can see the underside of the bike (It's a bit dirty... Sorry).
I have highlighted the mounting bolts as "A" on one side. On the other side is the experimental/bodge bracket B.
It should be possible to make the brackets so that they will not be visible when fitted (which is just as well).
Just to add this is quite fiddly to do with lots of plasticky bits to un clip and hopefully not break.

Hi,
Has anybody some advice regarding the different license plate holders?
I’m looking at this one from ebay:
Kennzeichenhalter Kennzeichenträger Yamaha MT 07 MT07 BJ 2014 MP | eBay
Is the same process as with the one from Yam where you have to change the connectors?
What about Yamaha org. one? Is easy to break when mounting it?
Right I finally got round to setting some time aside to fit the Yamaha tail Tidy last night.
The panels and old plate holder were all off in about 10 minutes so very easy there and no broken plastic rivets
Next was the wiring. I knew that the LED tail light had a different connector to the original;, but I also found out that the Yamaha LED indicators don't fit the standard wiring either. what I did was to cut the connectors from the original plate holder and use the bullet connectors supplied with the tail tidy to attach the original plate holder plugs to the tail tidy and indicator wires. Because of the LED flashers there is now A LOT of wires to find a space for under the pillion seat, but I'll try and tidy that up tonight.
My biggest hold up is that I got some blue wire mesh inserts for my rear panels and I simply cannot get the metal clips back on once the mesh is in place. I've tried pliers tips, my own fingers and a screw driver with no joy they keep popping back off. Anyone done this and got any ideas?
Time spent so far:
Tail tidy - 1 hour
Panel inserts 3 hours and counting
da1kini
New member
You have a plastic cover included in the set??Oh yes one other slight annoyance is that there is no plastic to cover the hole where the tail tidy mounts to the frame. I would have hoped they'd include something in the kit. This leaves a 4cm square hole where water can get under the pillion seat.
I will take some photos in the weekend of how it should look!
Last edited:
mellanslag
New member
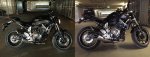
Looks nice.
Will the stock indicators fit with the new licence plate holder, or do you need to change to the led-type indicators?
Has anyone found a manual online describing the installation?
Will the stock indicators fit with the new licence plate holder, or do you need to change to the led-type indicators?
Has anyone found a manual online describing the installation?
da1kini
New member
heres a pic from underneath. You must have missed to fit that little plastic cover that the cables come out of? that seems like 4cm square as you are talking about is a hole for your set up.Oh yes one other slight annoyance is that there is no plastic to cover the hole where the tail tidy mounts to the frame. I would have hoped they'd include something in the kit. This leaves a 4cm square hole where water can get under the pillion seat.
da1kini
New member
it fits the stock indicators and you don't need to look online cause you get got instructions included when you buy it!Looks nice.
Will the stock indicators fit with the new licence plate holder, or do you need to change to the led-type indicators?
Has anyone found a manual online describing the installation?
da1kini
New member
Job done apart from the 2 rear plastic clips that don't stay in place in the undertray
you can order those from your dealer...its the same shorter ones that are located more to the front of the cover!
I went back to the dealer that got me the kit and he gave me this out of another box as I didn't have one. I have now fitted this too.heres a pic from underneath. You must have missed to fit that little plastic cover that the cables come out of? that seems like 4cm square as you are talking about is a hole for your set up.
View attachment 393
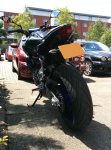
I love the look of the bike now, with a 7 x 5 licence plate it looks amazing from the rear, the tyre looks HUGE
The instructions are just pictures, but you get used to them very quickly and it shows you all you need to know. You can get some written instructions on the R&G website which describes which panels need to be removed and how, but the actual tail tidy bit is not the same, but the pictures and words are useful all the same.it fits the stock indicators and you don't need to look online cause you get got instructions included when you buy it!
You do most of the work before fitting it as you have to build it the way you want it, with or without the extension arm. With the standard indicators you will only need to make up a new lead for the licence plate light as the new lead will NOT fit the bikes wiring. If you have the LED indicators NO leads will fit the bikes wiring.
What I did is cut the plugs off the old licence plate holder and re-use them with the bullet connectors supplied in the kit, if you take your time it's easy. I'm sure you could buy adaptor leads somewhere?
The job is tricky but worth it