spoonflames
New member
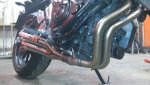
So is this the L3X?found this here for £380 for full system
Great price
Exhaust Ixil BLACK Hyperlow Dual Exit Full system Yamaha MT07 - Jesters Trick Bits Limited
")
So is this the L3X?found this here for £380 for full system
Great price
Exhaust Ixil BLACK Hyperlow Dual Exit Full system Yamaha MT07 - Jesters Trick Bits Limited
Your have to stick a vid up once you have got it, as i think this is the exhaust ill be going for tooYesterbits has good pricing, other two systems have even better pricing. I think I am set for the IXIL exaust
Yes i think soSo is this the L3X?
This forum member have fitted in november last year! Maybe he knowsHi!
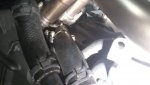
I bought the IXIL Hyperlow X3L in December but today I finally got the chance to fit it on my bike. I couldn't get it fitted. Could someone please post detailed photos/instructions where to screw it in place? The exhaust hits the rear swing when trying to put it in the same holes as the original one was. And the original exhaust had some copper(?) seals or gaskets on the header, should i use these on the IXIL also? AND on top of these things, the lambda sensors wire is kinda short for it to fit in the hole on the exhaust. And when trying to fit the muffle in the original exhaust holes, there seems to be left a gap between the header and muffle (where these two connects and should be tightened with the metal hoop/band)..
Please all help will be welcomed!
A few things guys.
1. You must reuse the copper header gaskets. I have read mixed impressions of this in that some people say they are a one time use crush gasket and others say that they basically last forever.
If you really want to play it safe, install new ones with your new header.
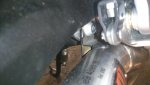
2. After you've removed your factory exhaust, the hanger with the rubber bushing on the RIGHT side of the bike (exhaust side) is where you will want to bolt the hanger on the can. You simply put the cone shaped washer over the head of the screw, push it through from LEFT to RIGHT if the bike is facing headlight forward. Once you've pushed the screw through the rubber bushing in the exhaust hanger, go ahead and hang your can from the screw. You then take your bolt and torque the bad boy down. In case you didnt know, you will need to remove your footbrake assembly. Not entirely, but just the two screws holding it on so that you can move it out of the way to access the hanger.
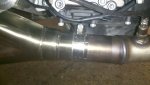
3. You need to make sure that your header is properly installed, ie straight in order for the can to have swing arm clearance. Where my header tube naturally sat, i had an inch of clearance for the can.
4. There are no torque specs for the bolts so make sure that they're all very tight. I used blue loctite on the exhaust hanger bolt to ensure that vibration would not loosen anything.
5. Use high temp RTV silicone sealant between the can and the header tube and make sure you TORQUE the CRAP out of that hose clamp. I was just involved in a lowside crash this week, exhaust side down and when i picked my bike up, my exhaust can was loose from having taken the brunt of the fall. It was loose at the hose clamp side but i was able to get the bike home with no issues. I torqued everything up again and all was well in the world.
Sorry for the lack of torque specs but IXIL usa had nothing for me when i gave them a ring.
When i get my bike back i can take pictures of everything.