cosmikdebriis
New member
Okay. This follows on from my previous thread "How to... Exhaust System Removal".
General overview...
In this thread I show how I chose to fit the Arrow exhaust system but without the centre/extension pipe. I preferred this to the manufacturers system.
Some of the procedures are the reverse of the removal so you may want to refer to that thread before attempting this one.
I have included two methods for mounting the silencer. One is quick and simple requiring no additional parts. The second is (in my opinion) better but does require some 8mm (M8) studding and some (preferably) Nyloc nuts to suit.
The second method has the advantage of the silencer being properly rubber mounted and is relatively easily adjustable to suit your requirements.
You will need...
10mm, 12mm, 13mm, sockets, Extension bar (preferably a wobble bar). Open ended/ring spanners of the same size. 6mm Allen key. Hack saw. "Coppaslip" or similar. NEVER be tempted to use grease where I mention Coppaslip. Some Coppaslip (or similar) is supplied in a sachet in one of the plastic bags.
Also, for second method. 200mm length of 8mm (M8) studding. 6 off M8 nyloc nuts (or ordinary nuts and star washers). Some patience.
The Disclaimer...
The following is just a guide and is the method I chose. Other methods may be better. I will not accept any responsibility for any damage caused to you, your bike, your mate or anyone or anything that may get damaged. Do this entirely at your own risk and please consider any implications this may have on any warranty or insurance(s) If in doubt... Don't do it at all. Note: There is no provision for a catalytic converter in this system.
How To in pictures...
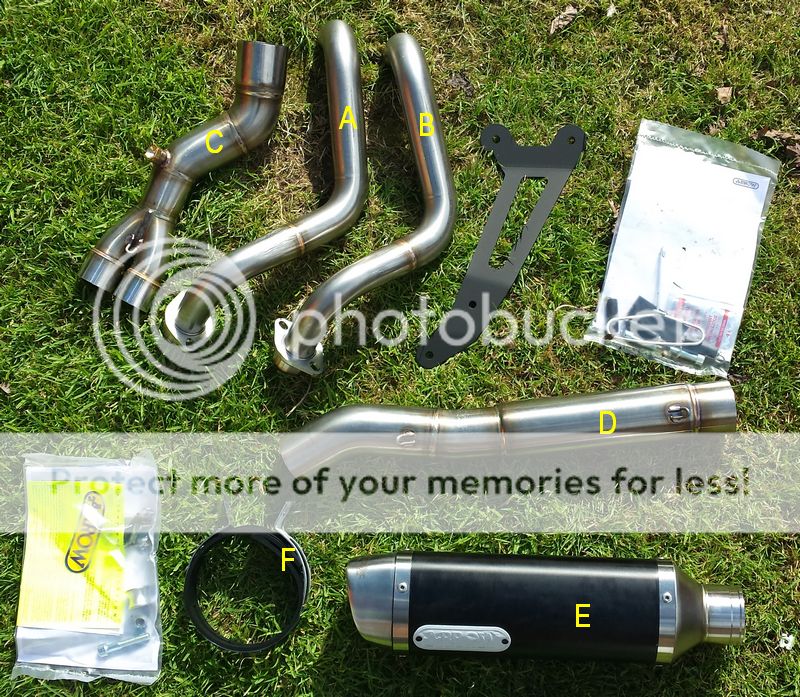
Picture 1...
Showing complete exhaust system as arrived in the boxes. (There are optional silencers available though I would assume the same mounting methods would apply).
A) and B) the down pipes.
C) The collector pipe.
D) The extension pipe (Not used)
E) The Silencer.
F) The silencer mounting strap.
Also two plastic bags of bits that we will need some of and a black mounting bracket that we do not need.
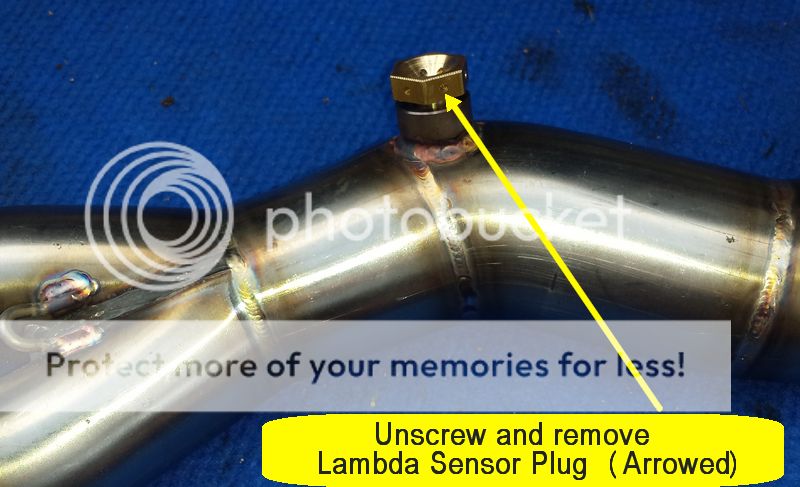
Picture 2...
Remove blanking plug supplied (This is where your Lambda sensor fits). Assuming you have one.
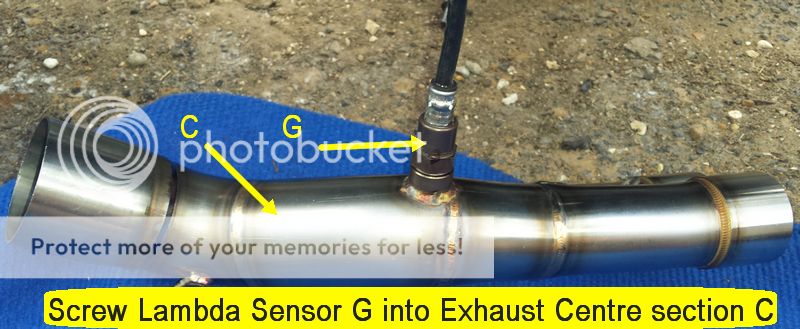
Picture 3...
As I chose not to disconnect the Lambda Sensor on removal of the original exhaust. Now is a good time to screw it in to the collector by rotating the collector. (see removal thread) Use some Coppaslip sparingly on the threads to aid removal at a later date. DO NOT use grease.
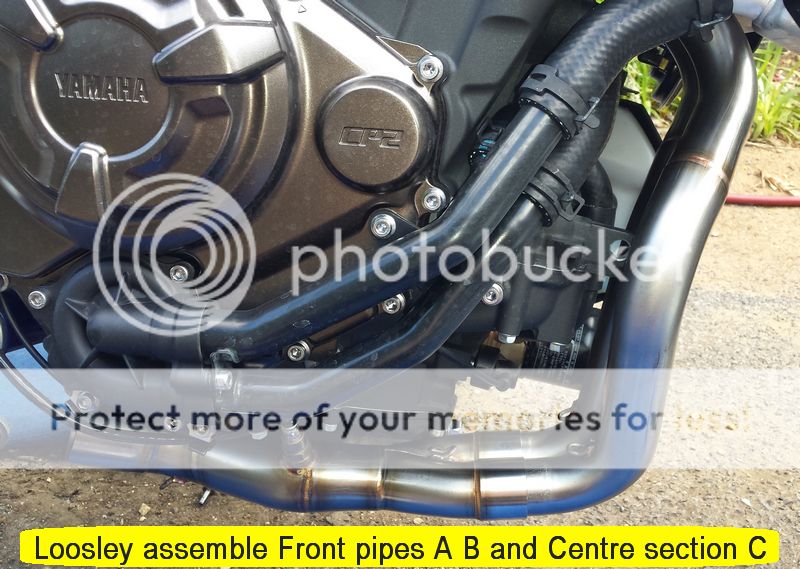
Picture 4...
Connect front (down) pipes (reversal of removal. See previous thread). Note: The pipes appear to be different/handed but I couldn't easily find a way of identifying them so it will be trial and error I'm afraid. It's pretty obvious if you get it right though.
Don't forget the two round gaskets from the original system. It may help to put a bit of Coppaslip on them to "glue" them in to the cylinder head. (not too much though). Do not fully tighten the M8 (12mm spanner) nuts as yet.
Loosely place the collector pipe on the down pipes (Do not fit the springs yet).
General overview...
In this thread I show how I chose to fit the Arrow exhaust system but without the centre/extension pipe. I preferred this to the manufacturers system.
Some of the procedures are the reverse of the removal so you may want to refer to that thread before attempting this one.
I have included two methods for mounting the silencer. One is quick and simple requiring no additional parts. The second is (in my opinion) better but does require some 8mm (M8) studding and some (preferably) Nyloc nuts to suit.
The second method has the advantage of the silencer being properly rubber mounted and is relatively easily adjustable to suit your requirements.
You will need...
10mm, 12mm, 13mm, sockets, Extension bar (preferably a wobble bar). Open ended/ring spanners of the same size. 6mm Allen key. Hack saw. "Coppaslip" or similar. NEVER be tempted to use grease where I mention Coppaslip. Some Coppaslip (or similar) is supplied in a sachet in one of the plastic bags.
Also, for second method. 200mm length of 8mm (M8) studding. 6 off M8 nyloc nuts (or ordinary nuts and star washers). Some patience.
The Disclaimer...
The following is just a guide and is the method I chose. Other methods may be better. I will not accept any responsibility for any damage caused to you, your bike, your mate or anyone or anything that may get damaged. Do this entirely at your own risk and please consider any implications this may have on any warranty or insurance(s) If in doubt... Don't do it at all. Note: There is no provision for a catalytic converter in this system.
How To in pictures...
Picture 1...
Showing complete exhaust system as arrived in the boxes. (There are optional silencers available though I would assume the same mounting methods would apply).
A) and B) the down pipes.
C) The collector pipe.
D) The extension pipe (Not used)
E) The Silencer.
F) The silencer mounting strap.
Also two plastic bags of bits that we will need some of and a black mounting bracket that we do not need.

Picture 2...
Remove blanking plug supplied (This is where your Lambda sensor fits). Assuming you have one.

Picture 3...
As I chose not to disconnect the Lambda Sensor on removal of the original exhaust. Now is a good time to screw it in to the collector by rotating the collector. (see removal thread) Use some Coppaslip sparingly on the threads to aid removal at a later date. DO NOT use grease.

Picture 4...
Connect front (down) pipes (reversal of removal. See previous thread). Note: The pipes appear to be different/handed but I couldn't easily find a way of identifying them so it will be trial and error I'm afraid. It's pretty obvious if you get it right though.
Don't forget the two round gaskets from the original system. It may help to put a bit of Coppaslip on them to "glue" them in to the cylinder head. (not too much though). Do not fully tighten the M8 (12mm spanner) nuts as yet.
Loosely place the collector pipe on the down pipes (Do not fit the springs yet).

Last edited:


")
